

The hb_menuBar widget let you create menu bars which contains drop down menus. This menus are defined using a simple xml syntax, and you can control the appearance of the menu using styles.
You can create as many menuBars like you need using the same hb_menuBar widget.
The first step is upload the hb_menuBar widget to the HB server, for an explanation about how to upload a widget read the post entitled 'Accessing databases with Hummingbird and scripting part I' and the section entitled 'Uploading a widget to the Hummingbird server'.
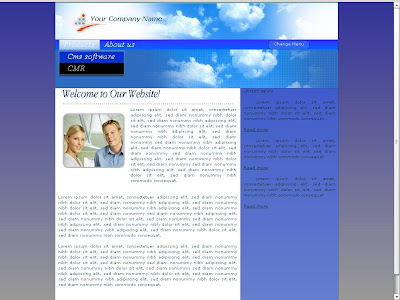
Once you have upload the hb_menuBar widget to the HB server. you must put the widget onto a HB page, like showed on this picture:You can create as many menuBars like you need using the same hb_menuBar widget.
The first step is upload the hb_menuBar widget to the HB server, for an explanation about how to upload a widget read the post entitled 'Accessing databases with Hummingbird and scripting part I' and the section entitled 'Uploading a widget to the Hummingbird server'.

On the above image you can see the widget on the upper right corner. This widget is only visible at design time.
The steps to create a menuBar using the hb_menuBar widget:
- get access to the instance of hb_menuBar widget.
- create a new instance of a menu using the instance of the hb_menuBar.
- set the options of the menu with xml using the setXml method of the widget.
- set some properties like the width, height, etc.
- set some styles for the menu in order to change its appearance.
- add the menu instance to a container (using the addChild method) in order to make it visible to the user. this container could be the page object (page.content.addChild) or a panel object that is visible to the user.
following is the code corresponding to every step described:
// get access to the menuBar widget instance
var mb=page.findObject2("/database2_2");
// create a new menu using the hb_menuBar instance
var m=mb.content.application.new_menu();
/*
set the options of the menu into a string variable with xml
in the xml string the 'label' attribute is the text for the menu's option and the 'data' attribute is used to identify the option selected for the user
*/
var menus=''+
'     <root>'+
'        <menuitem label="Home" data="1"/>'+
'        <menuitem label="Products" data="0">'+
'           <menuitem label="Cms software" data="2"/>'+
'           <menuitem label="CMR" data="3"/>'+
'        </menuitem>'+
'        <menuitem label="About us" data="0">'+
'           <menuitem label="Who we are" data="4"/>'+
'           <menuitem label="Clients" data="5"/>'+
'           <menuitem label="Partners" data="6"/>'+
'        </menuitem>'+
'        <menuitem label="Contact"  data="0">            '+
'           <menuitem label="Send us a message" data="7"/>'+
'           <menuitem label="Address"  data="8"/>'+
'        </menuitem>'+
'     </root>';
m.setXml(menus); // pass the xml with the options to the widget
// set the width of the menu to 100 percent of its container
m.percentWidth='100';
//m.height=30; // set the height of the menu
// set some styles for the menu
m.setStyle('cornerRadius', 0);
m.setStyle('letterSpacing', 1);
m.setStyle('fillColors',[0x3333ff, 0x0066ff]);
m.setStyle('rollOverColor',0x0033cc);
m.setStyle('color', 0xffffff);
m.setStyle('textRollOverColor', 0xffffff);
m.setStyle('themeColor', 0x0066ff);
m.setStyle('fontFamily', 'Times New Roman');;
m.setStyle('fontSize', 20);
m.setStyle('fontWeight', 'normal');
m.setStyle('fontStyle', 'italic');
m.setStyle('textIndent', 0);
m.setStyle('borderColor', 0x333399);
m.setStyle('borderStyle','none');
m.setStyle('fillAlphas',[1, 1]);
// we set the background color for the dropdown menus
var ms=new CSSStyleDeclaration(".myMenuBar"); // we create a CSS
ms.setStyle("backgroundColor",0x000000);
//ms.setStyle("backgroundAlpha",0.5);
m.setStyle('menuStyleName',"myMenuBar");
/*
add the menu to a panel, remember that the menu width
will be 100 percent of the width of its container, on this case
the container is the panel
*/
var o=page.findObject2("/database2_3"); // get a reference to the panel
if (o!=null)
{
// if you need center the menu onto the page uncomment the next line
//o.parent.x=page.content.width/2-o.parent.width/2;
o.addChild(m); // add the menuBar to the panel
}
we write the above code in the ready event of the hb_menuBar widget, like showed here:

The reason why we put the above code on the ready event of the widget is this:
Every widget triggers a 'ready' event when is initialized, let say when is just created, so this event is the ideal place to put our code in order to create a widget's instance when the page is just loaded into the user's browser, because that will be the moment when our widget will be created and the 'ready' event will be triggered. You must take into account that the video, the text, the panel and the picture are not widgets, they are built-in components and they don't trigger a 'ready' event, but if you need to execute some code when these built-in components are just created you can use the 'onCreated' event of the built-in component.
Every widget triggers a 'ready' event when is initialized, let say when is just created, so this event is the ideal place to put our code in order to create a widget's instance when the page is just loaded into the user's browser, because that will be the moment when our widget will be created and the 'ready' event will be triggered. You must take into account that the video, the text, the panel and the picture are not widgets, they are built-in components and they don't trigger a 'ready' event, but if you need to execute some code when these built-in components are just created you can use the 'onCreated' event of the built-in component.
after follow the steps described above you will have a nice menuBar on your HB page. But there is a question for resolve and is ¿ how do you execute an action when the user selects an option ?.
This is simple: when the user selects an option the widget will trigger and event called 'menuClick' and it passes to the event a parameter called 'data' which corresponds to the 'data' attribute defined for you on the xml string for the menu. watch the following code located in the menuClick event of the hb_menuBar widget:
This is simple: when the user selects an option the widget will trigger and event called 'menuClick' and it passes to the event a parameter called 'data' which corresponds to the 'data' attribute defined for you on the xml string for the menu. watch the following code located in the menuClick event of the hb_menuBar widget:
/*
this event is triggered when a user makes click on some option
of the menu, every option must have a data property which is passed
to this event in the info.data parameter, so you will know what option
was clicked by watching for this data
*/
if (info.data==0)
return;
// show a little message with the data attribute of the option selected
Alert.show("option choosed:"+info.data);
// now you must exec some action in response to the selected option
switch (info.data)
{
case '1': // home
break;
case '2': // cms software
break;
case '3': // cmr
break;
case '4': // who we are
break;
default: // others options
break;
};
you will see the above code on this picture:

That is, now you have completed all the steps to have a nice menuBar on your page. :)
a nice feature about the menuBar widget is that you can change the options of the menu at runtime, lets say you can add, replace o remove any option of the menu to adapt the menu according some criteria, like for example the perfil of the user that visits the page. You can disable an option using the 'enabled' attribute with a value of false.
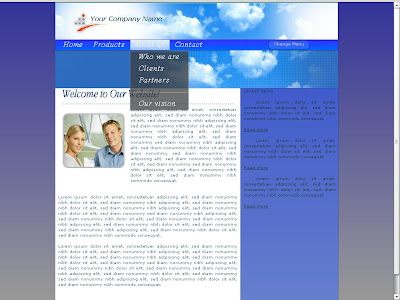
On the next picture you can see how using a button labeled 'change menu' we change the options of the menu when the visitor click on the button:
On the next picture you can see how using a button labeled 'change menu' we change the options of the menu when the visitor click on the button:

On the above picture you see how we added a last line of code to the 'ready' event of the hb_menuBar widget (database2_2_ready) in order to store a reference to the menu. this reference will allow us modify the menu in other events. On this case we will change the menu's options in the click event of the button 'database2_4' . you can see the code of the event on the next picture:

On the image you can see that using the setXml method of the menuBar with a new set of options the menu is refreshed automatically on the page. watch that we are using the 'enabled' attribute with a value of false to disable the option labeled 'CMR'.
On the next image you can see the menu with the new options set, just after we clicked the 'change menu' button:
A last note above the hb_menuBar widget: you can control the transparency level of the drop down menus, like you see on this picture:
nice :)
On the next image you can see the menu with the new options set, just after we clicked the 'change menu' button:

A last note above the hb_menuBar widget: you can control the transparency level of the drop down menus, like you see on this picture:

nice :)


No comments:
Post a Comment